Assigning materials
To be able to perform a thermal simulation it is necessary to assign a physical material or boundary condition to all geometric objects visible in the simulation region. There are several ways to assign materials (or boundary conditions) to objects. Depending on the kind and complexity of the model, some might be more effective.
The dropper tool 
You will find this feature in the quick-tool button located on the bottom of the screen. Just click on the symbol to activate the function. Once active you can click on any material (or boundary condition) in the project materials list to pick up a material. This material now “sticks” to the dropper cursor. To assign objects just (left) click on them in the graphics window. Alternatively you can also pick up colors from objects already assigned within the graphics window using the right-mouse button.
This method is particularly effective for assigning many objects, e.g. after a DXF import of CAD data or once you have finished drawing a model from scratch within HTflux.
Dragging materials to graphic objects
At any time you will be able to drag materials from the project materials list onto objects in the graphics window. Pick a material, hold the left mouse button down and drag the material to an object (drag&drop). This method is very effective to quickly process single or few assignments.
Note: if you have selected multiple objects prior to dropping a material on one of them, all the objects will receive the new assignment.

Dragging materials to the object list
Just like the method described above you will also be able to drag materials to the objects using their entry in the object list in the project manager on the right side of the screen. This method is particularly effective for assigning materials to small objects (such as films and sheetings) as these might be hard to select within the graphics view. The method is also very suitable for assigning materials to whole groups, when using a hierarchic object list.
Note: if you have selected multiple objects in the object list prior to dropping a material on one of them, all the objects will receive the new assignment.

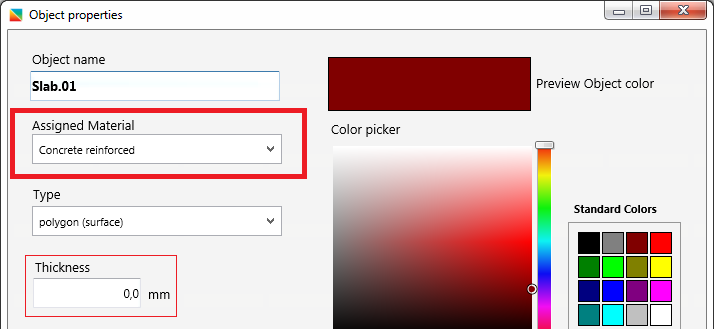
Assigning materials using the properties dialog
You can also assign materials using the properties dialog of one or multiple objects. To open this dialog just double-click on one item or select “properties” from the right-click menu. The properties window contains a drop-down list, which lists all materials and boundary conditions currently available in the project.
Note: if you have selected multiple objects prior to opening this dialog you will be able to perform changes to all objects selected. This method is also very suitable for assigning materials to films or sheetings, as you can also check or edit the thickness of the film while assigning the material (if you are drawing films using open polylines).
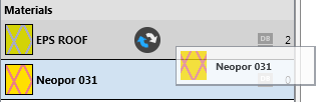
Exchanging materials using the project materials list
There is a very effective feature if you want to test alternative materials without having to reassign many objects. Within the project materials list just pick up a material and drag it on top of the material you want to replace. Drop the material (opening the mouse button) once two rounded arrows are visible. The “new” material will take the place of the “old” one, inheriting all its assignments. This means all the objects that had the “old” materials assigned will no have an assignment with the “new” material.