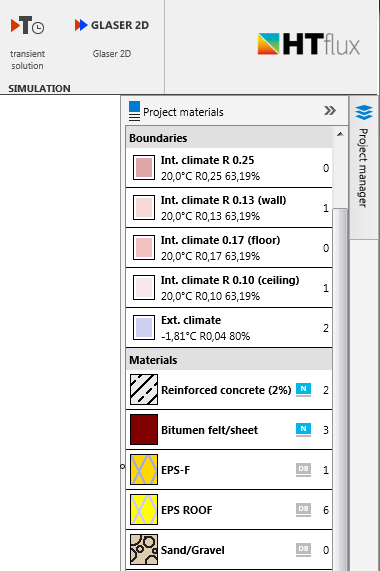
On the right hand side you will find the Project material list. It is an overview of all materials currently “loaded” into the project. The list contains all materials and boundary conditions actually used, but also other unused materials that might be relevant for later use in this project. If you create templates the project materials will all be saved within the template. This will enable you to create customer-specific or project-specific templates which will allow you to process further projects very efficiently. (see Templates).
Each element contains the name of the material as well as a preview of the material color (hatch). On the right side you will find symbol giving you a hint on the source of the specific material:
![]() material taken from “private material database”.
material taken from “private material database”.
![]() material taken from HTflux public database.
material taken from HTflux public database.
![]() material of HTflux public database marked as “standard” value.
material of HTflux public database marked as “standard” value.
The number on the very right side of the project material list displays the number of objects assigned to this material (or boundary condition). It can be very useful for checking the correctness of the assignments done.
Add or edit materials
Double-click on an item to open the Material– or Boundary-dialog. Within these dialogs you will be able to edit the properties of a specific material or to add new materials (or boundary conditions) to the project materials. Alternatively you can use the Materials- or Boundaries-button of the main toolbar to open these dialogs.
Reorder materials
The actual order of the materials is no relevant for the simulation. If, for the purpose of clarity, you still might want to reorder materials you can do this just by dragging the elements with the left mouse button. Make sure to drop the elements right in between other elements. This will be indicated with a vertical blue line appearing between two elements.
Replace material assignments
In case you want to exchange a material by another material without having to redo the assignments for all objects relevant, you can use the replacement feature. Just use the left mouse button to drag the “new” material over the “old” material. Drop the material once two rounded arrows are visible. The new material will inherit all the assignments done for the old materials. This way you can quickly test alternative materials without having to reassign each object.
Context menu – right mouse button
Clicking on an element with the right mouse button will launch the context menu for this material. This will show a selection of functions available for this item:
- Properties: opens the Material- or Boundaries-Dialog
- Rename
- Delete
- Duplicate
- Move to top
- Move to bottom


